

How to Choose a Hidden Safe Box for Money Storage at Home. Keeping cash secure yet accessible often means tucking it out of sight. Discover expert tips for selecting and concealing the perfect home safe…
1. Define Your Storage Capacity Needs
Begin by calculating how much currency you plan to store—emergency cash reserves, petty cash envelopes, or large bundles. Estimate the volume in cubic inches, then add a 20% buffer for future increases. A safe box sized too small leads to overcrowding and damage; one too large wastes valuable concealment opportunities. Accurate capacity assessment ensures you pick a model that fits both your cash amount and your hiding spot.
| Capacity Range (cu in) | Suitable Cash Volume |
|---|---|
| 100–200 | Small emergency fund |
| 200–400 | Monthly household cash |
| 400+ | Multi-month reserves |
2. Choose the Right Lock Mechanism
Hidden safes offer mechanical combination dials, electronic PIN keypads, or biometric fingerprint locks. Mechanical dials require no power and resist magnetic bypass but take longer to open under stress. Electronic keypads allow swift multi-user codes yet demand battery changes. Biometric locks grant instant access but need backup PIN or key in case of sensor failure. Align lock type with your family’s comfort level and reliability requirements.
3. Select Materials and Construction Quality
Robust safes use 14–16 gauge hardened steel to resist cutting and drilling attempts. Welded seams and concealed hinges eliminate common pry points. Fireboard liners add thermal protection, but for pure concealment you may opt for steel-only models. Check manufacturers’ specifications for plate thickness and seam reinforcement. High-quality construction ensures your hidden safe withstands both casual and determined intrusion.
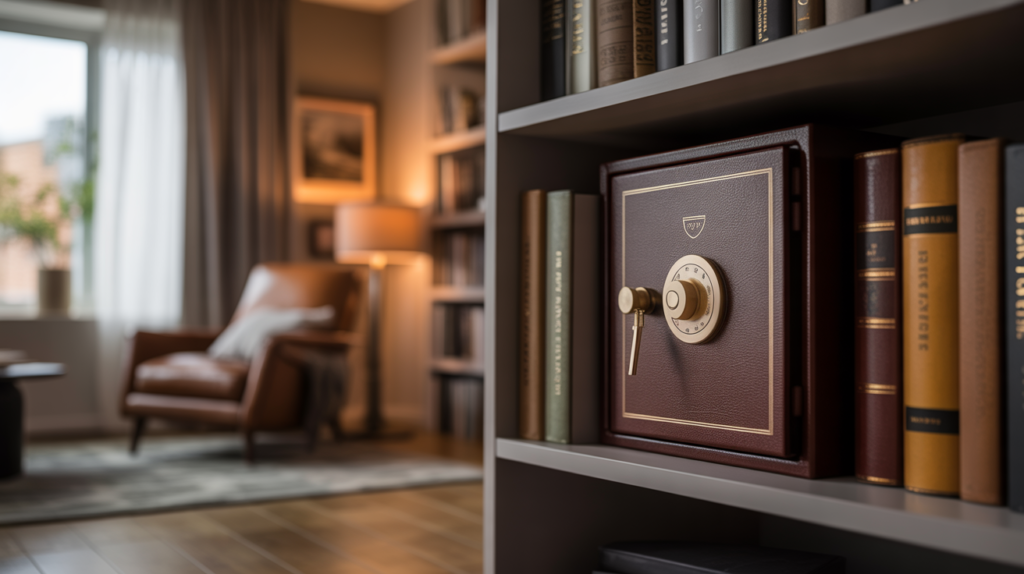
4. Evaluate Concealment Strategies
The ideal hidden safe blends seamlessly into its environment. Consider false-bottom drawers, hollowed-out bookshelves, floorboards beneath rugs, or behind kitchen panels. Each concealment method demands specific safe form factors—flat models for under-floor hiding, block shapes for in-wall cavities, or drawer-safe dimensions to fit cabinetry. Choose a safe whose shape and size match your planned hiding spot to avoid awkward gaps or visible bulges.
| Concealment Spot | Safe Form Factor |
|---|---|
| Under Floorboards | Flat rectangular |
| Inside Closet Walls | Block or cube |
| False Drawer Bottom | Shallow drawer-safe |
5. Fire and Water Resistance Considerations
While concealment is primary, protecting cash from fire and moisture adds resilience. UL-rated fire liners maintain sub-350 °F interiors for 30 minutes, enough for local fire department response. Waterproof gaskets block sprinkler spray and minor flooding. If you store large sums, choose a model offering both fire and water seals to preserve cash integrity even in home emergencies.
6. Ease of Access vs. Level of Secrecy
Highly concealed safes can become frustrating to access quickly. Test door swings and code entry in your chosen spot before final installation. Balance stealth with ergonomics: keep the safe within reach in low light, ensure keypad backlighting, and avoid secret panels requiring complex removal. Ease of use reduces accidental reveal attempts and ensures you can retrieve funds when every second counts.
7. Installation and Anchoring Requirements
A hidden safe must also be securely anchored to prevent removal if discovered. Use pre-drilled mounting holes with ½″ lag bolts into studs or ⅜″ wedge anchors in concrete. When anchoring inside walls or under floors, avoid conductive bolts that can transfer heat into fire liners. Proper anchoring transforms your concealed safe into an immovable asset, deterring theft while preserving concealment.
| Anchor Method | Substrate |
|---|---|
| Lag Bolt | Wood Stud |
| Wedge Anchor | Concrete Slab |
| Toggle Bolt | Drywall (limited load) |
8. Interior Organization and Cash Management
Even small safes benefit from interior trays or elastic straps that prevent loose bills from shifting. Use labeled envelopes or pouches to categorize funds—emergency, travel, or daily expenses. Clear organization simplifies audits and reduces cash contact time, minimizing the risk of revealing your hiding spot through messy handling.
9. Weight and Portability Factors
A heavier safe resists carry-off but may compromise its hiding method. If you plan to relocate it periodically, aim for models under 25 lbs. For truly permanent hiding spots—beneath floorboards or inside walls—heavier safes bolster security. Match safe weight to both concealment strategy and theft-resistance requirements.
10. Aesthetic Integration and Discretion
Choose finishes that match your hiding environment—wood grain panels for cabinetry, matte black for closets, or textured powder coat for garage walls. Some hidden safes offer interchangeable faceplates to mimic picture frames or vent covers. Aesthetically integrated safes reduce the chance that intruders spot anomalies, reinforcing both security and home décor harmony.
| Finish Option | Best For |
|---|---|
| Wood Veneer | Built-in furniture |
| Matte Black | Closet interiors |
| Decorative Panels | Wall art concealment |
11. Budgeting and Value Assessment
Entry-level hidden safes start around $50 for basic steel models, rising to $200+ for fire-rated or biometric versions. Factor in installation costs—drywall cutting or cabinetry modifications—when setting your budget. Compare total expenses against the value of stored cash and the potential cost of theft or fire loss. In most cases, modest investments in quality concealment pay dividends in peace of mind.
12. Maintenance and Longevity
Inspect your hidden safe annually: test locks and replace batteries if electronic, check for corrosion around seals, and verify anchors remain tight. For fire-rated models, review liner condition every five years and replace liners as recommended. Routine maintenance ensures ongoing protection without compromising concealment effectiveness.
13. Testing Your Concealment Plan
Before finalizing, stage a mock break-in test. Have a partner attempt to locate the safe within a set time. If they find it quickly, reassess your hiding strategy. Regular testing under different lighting and environmental conditions—daylight, dim light—helps refine location choices and ensures your safe remains secure against both opportunistic and determined searches.
14. Legal and Safety Considerations
Ensure your hiding method complies with building codes and doesn’t block emergency egress. Concealed wall safes must not compromise stud integrity or electrical wiring. For floor installations, verify you maintain structural load specifications. Always use fire-rated panels when required by local fire ordinances to preserve home safety.
15. Final Checklist for Choosing Your Hidden Safe
- Calculate cash volume with 20% buffer.
- Select lock mechanism matching reliability needs.
- Opt for steel gauge and liner thickness per threat profile.
- Match safe form factor to concealment spot.
- Consider fire and water resistance if budgets allow.
- Balance accessibility with stealth.
- Anchor using appropriate hardware and avoid heat conduction.
- Organize contents with trays or straps.
- Choose finish that blends into environment.
- Stage mock discovery tests periodically.
FAQ
Q1: Can I install a hidden safe myself?
Yes—many models include DIY anchor kits; ensure proper tools and follow manufacturer guides.
Q2: How do I change the combination on a mechanical dial safe?
Refer to the user manual; most safes provide a change key or internal switch for code resets.
Q3: Is it safe to conceal a fire-rated safe behind drywall?
Yes—maintain clearances and use fire-rated drywall to preserve liner performance.
Q4: Will a hidden safe block Wi-Fi signals?
No—steel walls may attenuate signals slightly, but most small safes won’t disrupt home networks.
Q5: How often should I rotate my hiding spots?
Every 6–12 months or after any home renovation to stay ahead of potential intruders.

